Navigate / search

Colour Blast Classes – March 2017

These classes will be at the Colour Blast Retreat and are also open to the public! (March 17-20 2017)
I have really enjoyed creating these and exploring the possibilities using Colour Blast products!! So many fun techniques to learn!!
There are still a couple of spots available for the retreat too.
If you are interested in coming to the retreat contact Tenisha on 0415648027 or email colourblastaust@gmail.com
If you are interested in booking into the classes click on the links below or HERE
 

Loving the effects you can create from this class, there is more than meets the eye in this class. Don’t worry if you are a complete beginner this class suits all levels. You will be drawing and colouring like a pro in no time. You can create a picture to frame or card, layout or art journal page. You can book into this class HERE

The Abstract Skyline classes were so popular last year I have explored some of natures skylines. I love a surprising little technique for this class using embossing powders. Again this class can be created on a canvas, card, layout, art journal. Learn how to create some surprising background techniques. You can book into this class HERE

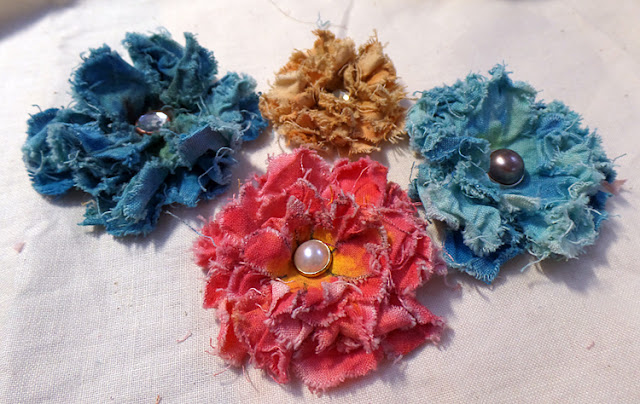
This class will be on the Monday and full of easy embellishment ideas sure to surprise you, Who knew one simple little tool could create all this. 🙂 I can’t wait to show you what it is. Get in quick and book in HERE!

If you would like to do both of Saturdays classes you can book in for the 2 HERE and save $10!!!

Or if you would like to do all 3 and save even more book in HERE!

Hope to see you there! 🙂

Crafty Crusaders ~ Setacolor Fabric Flowers

Creating these gorgeous Fabric flowers with the Pebeo Setacolour Fabric Paints is super easy.
All you need is a some calico, Setacolour Fabric Paints and decorative brads,
I have created a template you can use to cut out the calico flowers.
You can download this template from HERE
Once the template is printed just lay the calico over the template and draw the flowers on the calico with a pen.
Paint the colours you want over the flower I have used Cherry Red and Buttercup on this flower.
The thicker you add the paint and more solid will give you a darker colour.
Spritz the flower with water and then lay another piece of calico over the top to imprint a second flower, this also blends the colour in the flower.
 

 You can keep spraying the original painted flower with water and lay a blank piece of calico over it to create an imprint. You can imprint more than one copy from one flower onto another piece of calico.
 While the flowers are still damp cut them all out.
 Then roll them up into a ball in the palm of your hand.
 Unroll them and layer up the flowers and then attach together with a brad. You will need a craft knife of poker to poke a hole through the calico for the brad.
 Oriental Blue, Chamois and Buttercup was used on this flower.
Orange, Chamois and Buttercup was used on this flower.
If you
want your flowers to be darker and richer in colour you can add less
water over the flower and don’t imprint off the original flower.

Friends ~ Donna Salazar ~( 3 Tutorials in 1)

Hi again, good to see you back here! Against all odds I have this post ready for you today. And I mean all odds, it has been a long road to get this post happening. My new computer of 12 months crashed, so I got my old computer reformatted to use and it too crashed yesterday, it kept freezing and was super slow and  playing up which reminded me why I upgraded in the first place. Anyway it has been a trial as I am now using the laptop. But it hasn’t been easy as the programs and printer are hooked up to the desktop. It’s always the way when you have a heavy workload with umpteen deadlines looming! But I made it! Maybe with a few extra grey hairs but I am here! Phew! OK Back to normal programing, I am back with another Donna Salazar Design for you today with 3 tutorials for the price of one. 
This layout is on a group of Leonii’s childhood friends from primary school. Its great that they keep in contact and and catch up when they can, even though they have left school.

Lots of yummy Donna products on this layout. Here is a tutorial on how I created the background:

 I have used the Kaisercraft TigerLily Butterflies and the Want2Scrap Butterfly Bling to create these cute little butterflies. Here is the Tutorial on how I created these:
Last but not least here is a tutorial on making Paper Towel Flowers. I love the colours you can get when you clean up your spray ink with a paper towel. The best part is that you always have flowers that match your project perfectly.

The Chipboard flourishes were inked with the black MMI and embossed with the Black & Indigo Embossing powders.
 Materials Used:

Clearsnap
Other Products:
Paper Towel
Tags, Doiley, Brads

Embroidery Thread

Friends Tag – Unknown.

Adhesives

Helmar Tiger Grip
3D Foam Tape
Double Sided Tape 


Tools

Heat Gun

Thanks for dropping by!
Have a great day!
Cheers
Michelle xx

My Girl – DSD – My fist Video Tutorial – Handmade Flowers with Lace.

Hi there, so lovely to see you here again! Today I have another Donna Salazar Creation to share with you. Using the Beautiful Botanique Paper Range and the Want2Scrap – Build your own Bling.
I have also created my very first online video tutorial. It has been a huge learning curve for me and very nerve wracking. I think I sound dreadful on camera but anyway it is done! I am a little excited that it is done now too! The Video Tutorial is on making your own handmade flowers with the Mix’d Media Stax papers and Lace, with a little smooch and fairy dust thrown in for good measure.
I will also be sharing a tip here on colouring bling to suit your projects.

Here is the layout I have created for this project. This is an old photo of my gorgeous daughter Leonii and myself taken a few years ago. There is lots of fussy cutting on this layout too.

When I am fussy cutting for clusters, I cut out whole pieces and then cut them down to smaller  pieces when needed. Helps to manipulate your fussy cut pieces to fit perfectly into the available spaces.


Coloured Bling Tutorial
 The bling on this layout started out as the clear silver bling. I have coloured them using the Smooch Spritz Sprays. Although these are not permanant inks I found that it held the colour enough for what I wanted here. You can also use Alcohol inks for a more permanent finish.
Step 1: Grab your clear bling, a smooch spritz spray,
I have used the Candle Glow Smooch here and an ink aplicator.
 Step 2: Spay a little of the smooch spritz on a piece of plastic or a craft sheet.
I have used the packet the bling come in here.
Then Load your ink applicator with the ink.
 Step 3: Then simply dab the ink over the bling.
Leave to set for a minute or two then dab off the excess with a paper Towel.
Now here is my first video tutorial! Thanks for watching!


Materials:
Clearsnap

GCD Studios
Papers

Other Products:

Lace
Decorative Brads
Basic Grey Alphabet – Hopscotch Micro Mini


Adhesives
Helmar Tiger Grip 
Double sided tape & 3D Foam Tape!
Tools
Craft Knife, Fine tip Scissors
Heat Gun
Needle & Thread (Handstitching)
Fiskers Border Punch


Thanks again for dropping by and checking out my tutorial!
Have a Great Day!
Hugs
Michelle xxx